It’s been two weeks of finding compatibility issues, and trying to make the hackintosh as stable as possible. It’s done, finally. The Mac Pro 3,1 is now replaced by a better, faster, and maintainable machine built from PC parts. Here’s the story.
The Completed Hackintosh Build - Comfortably Stable
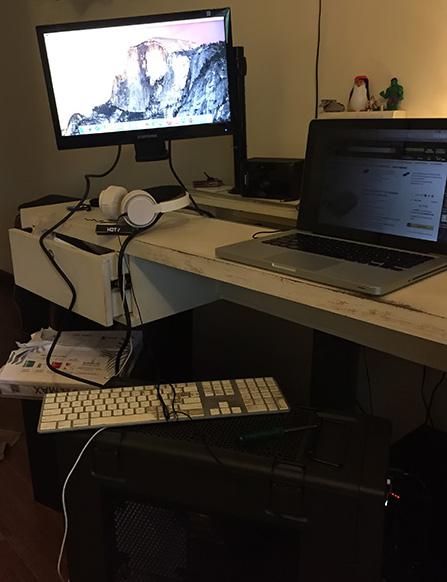
Here’s the completed build, shown below. The only changed since this picture was taken is the addition of the Wifi range extender, and the bluetooth mini adapter. Read more below.
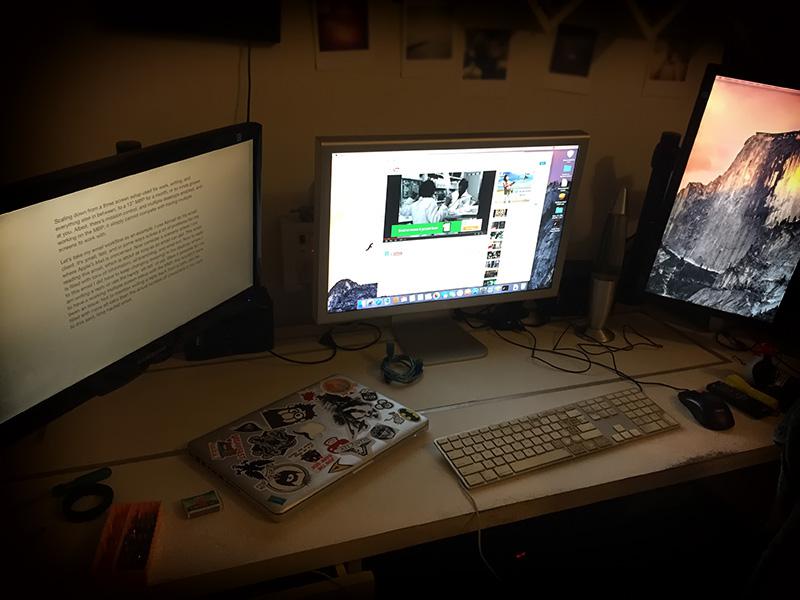
The Completed Hackintosh Build - Awesome, and Comfortably Stable
See more photos at the end of the post.
See Geekbench scores for this build.
What Went Into The Hackintosh Build & The Issues I Faced
Buying, and assembling compatible parts was the easy part. Once the cabinet arrived, the assembly got done within the span of the first four hours. This was my first assembly after a very, very long time. The total cost of ownership was ~750-800USD. The below is the part list that runs Yosemite OS X 10.10.4 …
Compatible Parts List For This Hackintosh Build
The part list was made with the compatible part recommendations post, over at tonymacx86.com.
Motherboard:
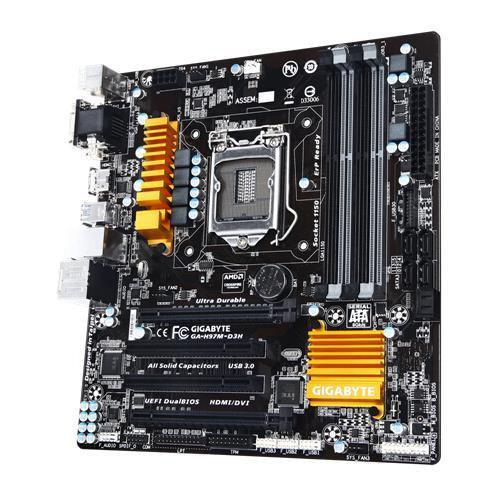
Gigabyte's H97M-D3H for LGA 1150 for 4th, and 5th Generation processors
I had many options with respect to compatible motherboards. Gigabyte, because of it UEFI Dual boot option is one of the best brand of motherboards compatible with Mac OS X. The H97M-D3H is mATX sized motherboard. This 9 series motherboard does not require a pre-patched DSDT. And although the list for the 9 series motherboards said that all the listed 9 series motherboards have native sleep/wake functionality, I wasn’t able to test this completely - more on this below. I chose the H97M-D3H over the Z97M-D3H because for my needs I don’t require overclocking, and the form factor was perfect for now. The motherboard has had been used before successfully, for setting up a working hackintosh.
CPU:
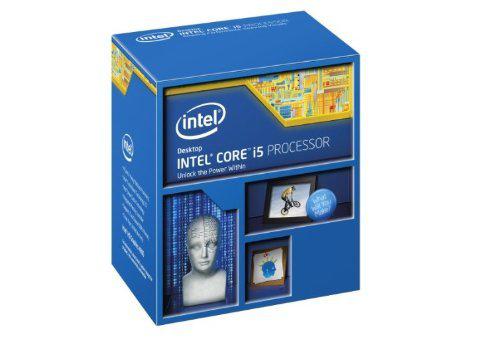
Intel’s Core i5 4460 3.2Ghz Quad Core LGA 1150
A nice mid range processor. Get’s the job done. It’s a 4th generation Haswell Refresh processor with HD4600 integrated graphics support. If required can be “turbo” boosted to 3.4Ghz - again I don’t think I will require that with my current usage. It’s a big change from the two quad core Xeons with four cores each, but this gets the job done none the less.
RAM:
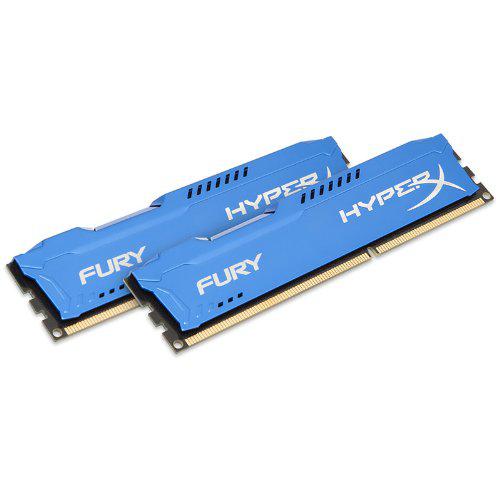
A single stick of 8GB Kingston HyperX FURY 1866MHz DDR3 CL10 DIMM - Blue
Yea I got to the part where the Gigabyte motherboard I have only supports a bus speed of 1600Mz, much later. None the less, works out of the box, and the bus speed is downgraded to 1600Mhz.
To save some dough I chose Kingston Fury X over Corsair’s Vengeance Pro series. I realized much later in the game, when benchmark scoring the build that the difference if not noticeable, is still there. None the less, this too gets the job done. Later, I am going to upgrade the ram to 32GB.
Power Supply Unit:

Corsair RM Series 1000 Watt ATX/EPS 80PLUS Gold-Certified Power Supply
A modular power supply unit, with 10 years of warranty. Provides ample enough power to put in whatever else I can think of putting in the case. I went directly for the 1000w unit because I was thinking of future proofing the entire system. 4th and 5th generation ready. Will support SLI, when needed. Not that I need it.
dGPUs:

Two NVidia GT 120s, each with 512MB VRAM - Mine were from MacVidCards, so they look a little different.
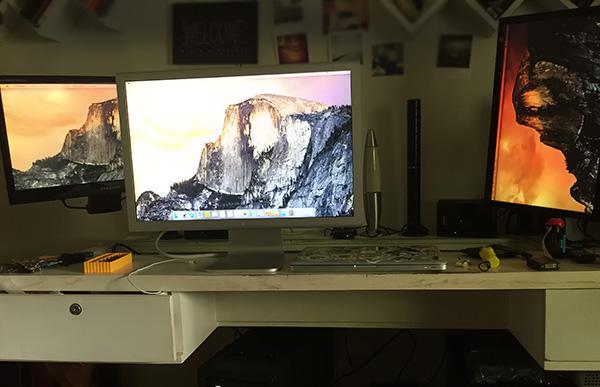
The two I have, were cannibalised from the Mac Pro 3,1 (Read more about that here). I got mixed replies to various posts on various hackintosh forums, and channels about these working OOTB. Most said they should work, some said they wouldn’t. I wanted the two discrete GPUs to work with Intel’s HD4600 integrated GPU. A lot of them said, it may not be possible. But at the time of writing this post, I have 3 screens up, and running. Each screen having it’s own GPU to work with. Two with two GT120s, and one with the HD4600 integrated GPU. I had issues along the way with the GT120s. They do work out of the box, but need the NVidia drivers. More on this below.
Bluetooth:

IOGEAR Bluetooth 4.0 USB Micro Adapter
The IOGEAR bluetooth works OOTB. I had some issues with the mouse being “laggy” when both Apple’s Wireless keyboard, and Mouse were connected together using the dongle. But that has been resolved. Read below for more on this.
Wifi/Network:

For some time I was using the EDUP EP-N8508
The internal NIC works fine, OOTB with the kexts from Multibeast installed. For some time I was using EDUP’s 802.11n USB Wifi dongle. The firmware is from realtek. There are OS X drivers that support this dongle. It worked, but because of the cheap build quality the reception was bad. I got an Edimax BR-6228NS V3, and set that up as an extender. Post which I directly connected the router to the machine via the ethernet port. Setting it up as a wireless extender is superbly easy.
Storage:

Kingston Digital 120GB SSDNow V300 Is My Startup Disk
Four 7200RPM Seagate Mechanical HDDs, and One SSD with Sandforce controller to the job just fine. Except for the SSD, the HDDs are canabalised from the Mac Pro 3,1. The SSD is a Kingston V300 Now 120GB, with a Sandforce controller. Which is important. Why? Read more about it here.
Cooling:
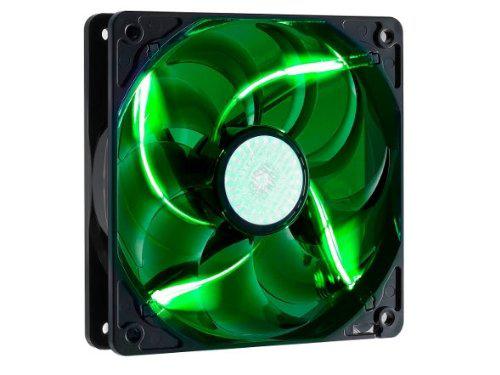
Cooler Master 120mm Sickle Flow
Two front fans from Circle providing 90CFM of pressure, set up to pull. Two Corsair fans that came with the case, set up to pull. One exhaust (push) fan, that came with the case. Two Cooler Master Sickle Flow X providing 69CFM, cooling the GPUs. The CPU fan is the one that comes out of the box with the Intel processor. There’s two more fans, and a H100i CPU Liquid cooler yet to come.
The Circle C-12 fans are the most quiet ones. The Sickle flows are noisy. But that’s fine, as long as they keep the case cool.
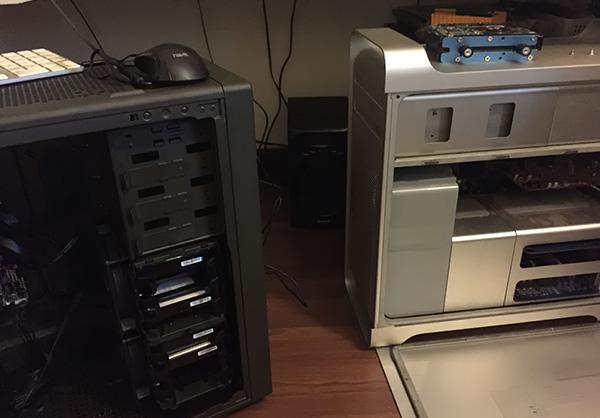
Cabinet / Case:
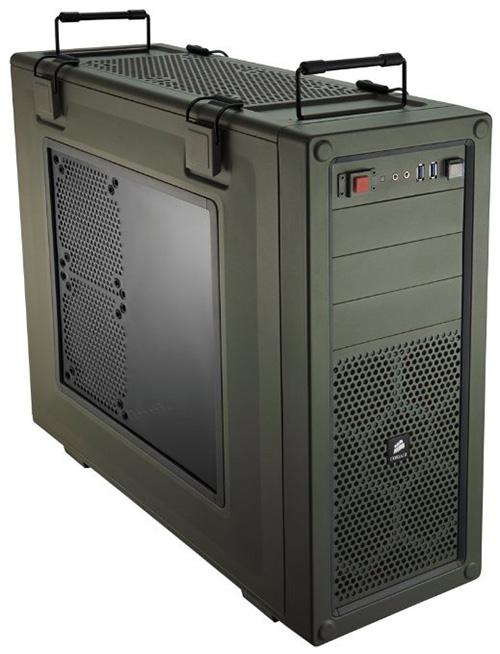
Corsair Vengeance Series Military Green C70 Mid Tower Computer Case
The cabinet is plain awesome. Not too big, not too small. I originally bought the Antec DF85, but cancelled and got this one instead. This I did to save up some time, and money - about 50-70USD of difference. It’s roomy, looks great! I love the front panel buttons. It’s all metal, with hardly any plastic. I did manage to break one of the HDD trays though. Assembly, and wire management were very easy.
Keyboard And Mouse
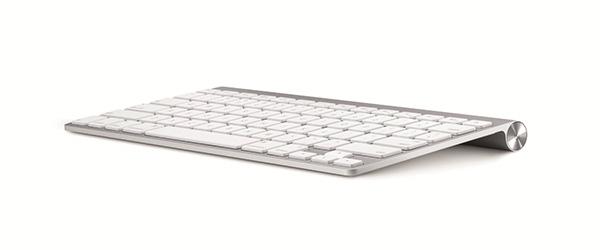
Apple Wireless Keyboard, And Magic Mouse
When I started setting up the hackintosh, I was using Apple’s Wired keyboard that came with the Mac Pro 3,1 and a simple USB mouse. Once the system was stable enough, I switched over to Apple’s Bluetooth Keyboard, and Mouse.
Issues with My First Hackintosh
Here are some issues, some caused due to me experimenting too much with what was written in the guides over at TonyMacX86.com. Some more serious. The serious ones took a lot of research, and reading time. Overall to get the system perfectly working, well almost perfectly working, I had to install Yosemite 5 times in total over the span of two weeks. I have no complaints here, as I have mentioned on the previous hackintosh post, I actually enjoyed the process. Yes, it drove me nuts while trying to figure why something wouldn’t work, but finding the answers, some of the not even listed in any of the forums online, did wonders for my confidence.
Yosemite Installer Wouldn’t Boot From The Unibeast Bootable USB:
This was a no brainer. Now I knew beforehand itself that there will be problems because I was using a projector as a screen, on the VGA port of the iGPU, something that every guide out there tells you not to do - I ended up doing so. I had no choice. The other screens would require VGA to HDMI converters, which I did not have lying around. I did have to wait till the next day to get these, and that would be wastage of time. So, I decide to work around the problem. I finally managed to get the installer working using kernel / boot loader flags. I installed Yosemite, and then I went to sleep. On waking up, and booting up the machine I expected too much. It wouldn’t boot, even with using the same boot flags. I took the time out to get the VGA to HDMI converter, and reinstalled Yosemite. This is when everything worked as expected. The installation was smooth, the reboot was smooth, shutdown, and restart worked flawlessly.
Sleep / Wake Issues:
At first when I hadn’t plugged in the dGPUs the sleep / wake did not work OOTB as claimed on TonyMacX86.com. This was frustrating because I rarely ever felt the need to shut down the Mac Pro 3,1. Having no sleep / wake working would mean that I would’ve to shut down the hackintosh machine, instead of putting it to sleep. The maximum amount of time for getting this rig stable was spent here. Trying to figure out why sleep / wake wouldn’t work. And I did, it was/is multiple issues. But I learned alot about pmset, darkwake, and hibernation in OS X. Causing the sleep / wake issues with the H97M-D3H, it’s the USB3.0. Both the Kexts, and the XHCI options in the BIOS. Not installing the universal USB kexts from Multibeast for Yosemite 10.10.4, did get the sleep to work. But every time you’d put the machine to sleep, immediately within a span of a couple of seconds after sleep the hackintosh would wake up. This was further narrowed down to the XHCI settings in the BIOS. XHCI, or eXtensible Host Controller Interface is an interface specification that makes the host controller capable of interfacing with USB 3 devices. While installation would require XHCI to be turned on, and the XHCI hand-off to be enabled from within the BIOS. I had to turn both of them off post installation. XHCI hand-off is meant for transfering USB 2 and lower speed USB devices to the AHCI, or the Advanced Host Controller Interface. At least that’s what I understood/understand of them. Making these changes made the sleep / wake work just fine.
Hackintosh Wouldn’t Boot After Long Shutdowns:
This was another one that took some time solving. The machine wouldn’t boot if I shut it down for anything longer than an hour. Initially I thought it to be that the XHCI was off, but later on it turned out to be the TRIM patch for Yosemite supplied by Multibeast, for SSD drives. On re-installing Yosemite, and making sure no TRIM patch was used for my SSD, the problem was solved. Read more about that here.
Random Freezes:
The OOTB kexts on Yosemite were somehow causing KPs while loading the default drivers for the GeForce GT120s. Installing the nVidia web drivers was an option, but when I did initially installed these, the nVidia drivers were causing freezes. I narrowed it down to me using a beta version of the drivers, instead of a stable one. Switched over to the stable branch of drivers, and while at it I installed the cuda drivers. This solved the issue.
Long Sleep / Wake Not Working:
Sleep / Wake for longer periods of time doesn’t work. This is again because of the GT120s. Somehow cutting power to them for a long time freezes the hackintosh machine on waking up after a long nap. I am trying to work on this with trying different values for pmset’s hibernate parameter. Hopefully this is solvable. If not, no harm done. I would turn off the machine. Yes it would irritate me, but compared to spending $200+ USD on a new dGPU, when I already have two of them working, that would irritate me more.
Bluetooth Issues:
When I started using the bluetooth micro adapter first, I had it pluggedin into the front panel USB 3 port of my case. This was causing the mouse to lag. Once I shifted the adapter to a USB 2 port outlet on the motherboard, the adapter started to work just fine. The bluetooth sometimes fails to load, and causes KPs every now, and then when booting up after a long shutdown. I have narrowed it down to the USB extension cable I am using. Nothing to be done there.
No Audio After Sleep:
This one was a simple one. Changing the machine profile from Mac Pro 3,1 to iMac 14,2 (because it’s the closest to the hardware setup I have) did the trick. You can do this from within Multibeast itself. I installed the correct audio kexts for my mobo, and added the AppleHDA 1.0 kext from the Divers pane in multibeast. HD Audio works great now.
App Store, And iTunes Not Working:
Post the first installation I wasn’t able to log into the App Store, or iTunes. This was because of me selecting the connection type during the first setup wrongly. I had to remove the networkinterfaces.plist file, then remove all the network interfaces in System Preferences, and reboot. This solved the issue.
What Is Working, And What Isn’t?
Currently, apart from the long sleep / wake, everything else seems to working fine. I have been using the hackintosh for a week now, and throwing at it everything I’ve got to throw at it. It’s stable enough for me to work comfortably. The main reason for a hackintosh was that if any of the hardware fails, I can just get out, go to the store, and pick up the replacement. Unlike the power supply of A1186.
Multibeast Configuration Used For This Build
Here’s everything installed with Multibeast. My current configuration. Hope this helps someone.
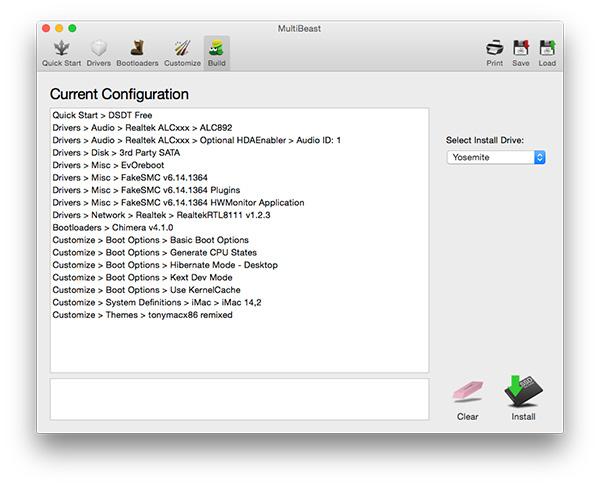
Multibeast Configuration.
Geekbench Scores: Hackintosh Build vs iMac 14,2
It’s clear that upgrading the RAM will affect this score for the better. The below image shows the Geekbench scores for my build.

Geekbench Scores.
See comparison of a real iMac 14,2 vs. this build.
Photos: The Hackintosh Build In Progress
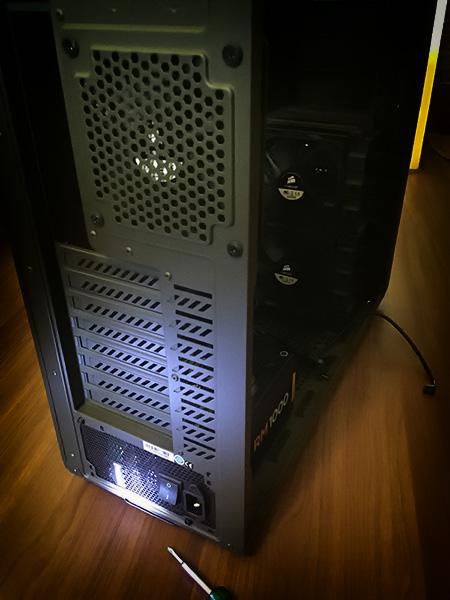
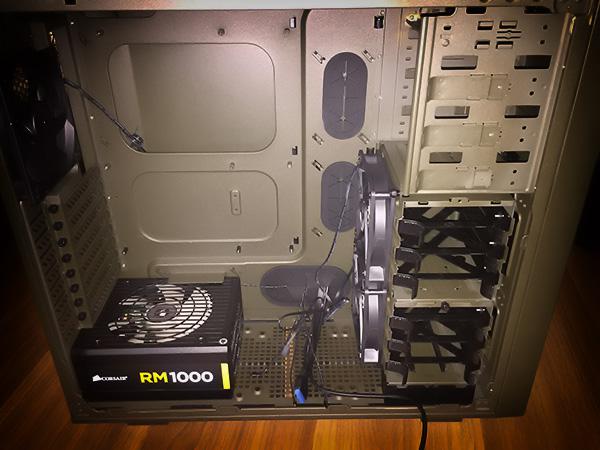
Installing the power supply into the case.
Setting up for installing the mother board in there.
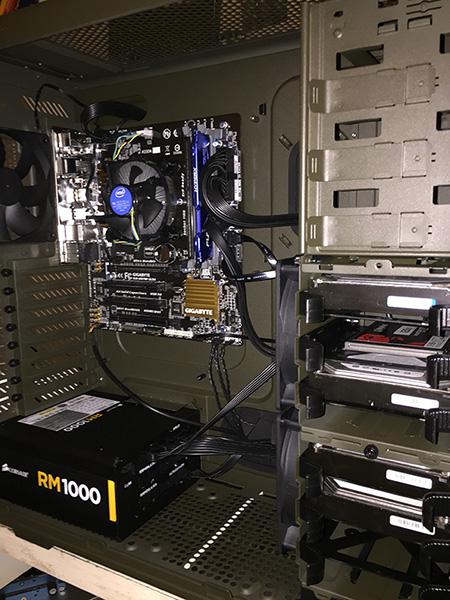
Mother board installed. Adding HDDs, and the SDD. The HDDs are from the Mac Pro.
Getting ready to fire it up.
Successful Installation of Yosemite. First Install. Without the Graphics Cards, or any other HDDs connected.
Transferring the GeForce GT120s from the Mac Pro 3,1 to the CustomMac Pro
First boot up after installing the two dGPUs. Here each screen has it's own GPU. All working for now.
Installing case fans.
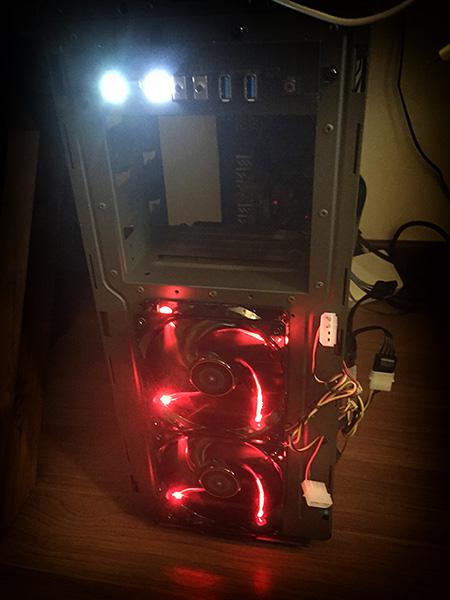
Front case fans installed.
Case fans installed. Two on the side over the GPUs, four in the front. Two in front of the case. Two behind the HDD racks. The Green ones are Cooler Master Sickle Flows. Bright, and noisy.
